Here is how to make a inflatable hanging giant mushroom. Like the ones I make for the Mushroom Forest.
things you will need:
-Inflatable beach ball
-Fabric about a meter and a half for the cap depending on size of beach ball
and enough for a long tube stem usually about 4-5ft long by 2ft wide
-Coloured felt for dots
-Fabric glue for the dots
-Velcro about 2ft or so
-String or twine to attach to the ball
-Duct tape
-Amazing goop
-Wire (I use 18g Galvanized steel)
-Fabric paint
Step one
Take 3-4 lengths of the string long enough to go around the beach ball loosely. Fold the strings in half and tie them off to create a loop. Make a hanging cage for your beach ball using the rope and some tape.
I like to line up the string to the lines on the beach ball. Make sure to leave enough of a peak at the top to give it a cone shape.I usually use electrical tape to place where it goes and then duct tape it down.
make sure to tie off all your strings at the bottom.
Step 2
now we are going to make the cap piece. First we measure our ball around its biggest point.
then we make a bell/cone shaped pillow case for the ball You can use 2 pieces or 3 pieces to do so you want the top piece to stay open so the string can pop out the top. After you have sewn all the pieces together leaving your hole at the top we sew a hem at the bottom leaving a space to feed wire through.
Take some wire and feed it through the hole.
Connect your wires at the end. This causes the cap to keep better shape
Step 3
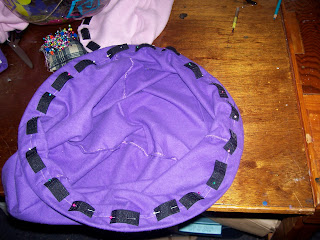
now take your cap and place it down on the pice of fabric you want to use for the under side. make sure the wire is fully sreached out and trace out the bottomnow we are going to put Velcro around the edge of the bottom fabric and then around the inside edge of the bottom of the cap piece we just made.
now we have a bottom for the cap. Using fabric paint make the frill lines.
Step 4
Next we make the stem. By making a long tube that is bigger at one end than the other
once sewn together sew a hem at the bottom for wire, and wire it like you did with the cap piece.
Step 5
While the fabric paint dries Hang the cap from somewhere that wont get in the way And cut out dots from the coloured felt.Glue your dots to the fabric in whatever pattern pleases you.
Step 6
Only do this if your fabric paint is dry.Measure where the top of your stem is going to sit on the underside. then amazing goop the stem to the underside of the mushroom.
try to make it so the fabric tube is all the way open when its glued down.
Once that is dry your dots should be dry and you can assemble the mushroom. The cap folds down and the ball deflates and the stem and bottom wrap up nicely for easy storage or transport making them wonderful decorations for interesting parties...
You can make them light up by sewing el wire around them in pleasing patterns.
I believe I also have another collection of picture of The mushroom forest on display again to post yet so there should be more soon.


yaaay! mushroom tutorial!
ReplyDeletenow see where they pop up... ;)